Do you have to varnish your oil painting? You don’t have to if you are not planning on selling it or keeping your painting for a long time. But, in general, it’s strongly recommended that you varnish your oil painting.
1: Why you do need to varnish your painting?
2: Two types of oil paint varnish
1: Why you need to varnish your painting
Because varnishing an oil painting is a crucial step in the process of preserving and protecting the artwork, while also enhancing its visual appeal. It has three main purposes:
- Protect from UV light, preventing your painting from yellowing over time.
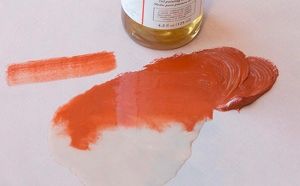
- Even out the colors, especially where the paint appeared to sink in and dull. Bring out the vibrancy of colors and unify the overall appearance of the painting.
- Shielding the painting from dust, dirt, pollutants, and yellowing over time.
Here’s a comprehensive guide on how to varnish an oil painting:
2: Two types of oil paint varnish:
Choose a varnish specifically designed for oil paintings. There are two main types of varnish: removable/retouch varnish and non-removable varnish.
Retouch varnish can be applied to paint which is “touch-dry”. The thin retouch varnish layer allows the paint to continue its deep drying thus avoiding cracking.
Retouch varnish is also excellent at reviving dull spots when you come back to a dry painting and want to blend dry and new wet oil colors together.
Removable varnishes can be taken off without damaging the painting.
This one is my favorite retouching/removable varnish: https://amzn.to/47NA1Cm
How to remove retouchable varnish:
If after a whole your varnish start to yellow or appear cloudy, you can remove the varnish with turpentine.
Starting in a corner of the painting, dip a lint free cloth into the turpentine and gently rub the surface of the painting.
keep a close eye on the cloth. If you see color coming off, stop right away.
Working in small squares, make your way across the surface of the painting and try to keep using fresh and clean areas of cloth.
Non-removable varnishes become a permanent part of the painting.
You cannot remove it, and you need to wait until the painting is totally dry before you can add it. This means you usually have to wait 6 months to a year to do so.
3: Materials Needed:
a: Oil Painting Surface:
Ensure that the oil painting is completely dry. If you use retouch varnish, make sure the surface is touch dry. Traditionally, it’s recommended to wait at least six months to a year after completing the painting before applying varnish. But nowadays, with the use of paint mediums like Liquin to speed up your drying time, you can varnish much sooner. So if you sell your painting before 6 month, or if you need to put your painting to gallery show, you can varnish them without worry.
b: Brushes:
Select high-quality, soft-bristle brushes. Avoid using cheap brushes that might leave bristle marks on the varnished surface. But even good quality brushes will still leave hair on your canvas sometimes, so you just need to pay attention. If there is hair on your canvas, remove it immediately because varnish dries very quickly.
c: Palette Knife(optional):
Useful for removing any impurities or dust that may have settled on the painting. Alternatively, you can wear a glove and remove it with your finger.
d: Clean Cloth:
For wiping the painting surface and ensuring it’s free of any dust or particles before varnish.
e: Well-ventilated, Minimal Dust Space:
Ensure you are working in an area with good ventilation to avoid inhaling fumes from the varnish. Your space should have minimal dust floating around.

4: Step-by-Step Guide:
1. Clean the Painting Surface: Before applying varnish, make sure the painting is free of dust and dirt. Use a soft brush or a clean cloth to gently wipe the surface.
2. Choose the Right Varnish: Select a varnish that suits your painting. Choose gloss varnish if you want to bring out the color vibrancy. But be aware that gloss creates a lot of reflection. Or opt for matt varnish, which means you avoid reflection, but color will appear duller. If you like to go with the middle route, use semi-gloss varnish. Test a small area of the painting first to see how the varnish affects the colors.
3. Mix the Varnish: If the varnish is thick, you may need to thin it with a solvent like mineral spirits. Follow the manufacturer’s instructions for the proper ratio. Pour the varnish into a jar and apply it from there.
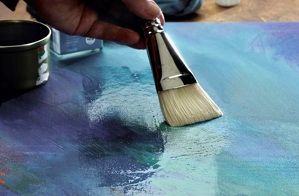
4. Apply Varnish: Dip the brush into the varnish, ensuring it’s evenly coated. Apply the varnish using even, long strokes in one direction. Avoid going over the same area multiple times to prevent streaks or bubbles. Use thin, uniform layers. Add more layers if necessary.
5. Work Quickly and Evenly: Varnish dries quickly, so work efficiently. Keep an eye out for drips or uneven application. If you notice any imperfections, use a clean brush or a palette knife to smooth them out.
6. Allow to Dry: Let the painting dry completely before applying additional coats. Follow the recommended drying time specified by the varnish manufacturer.
7. Repeat if necessary: Depending on the desired effect, you may choose to apply multiple coats. Be sure each coat has dried thoroughly before applying the next.
8. Protect from Dust: While the varnish is drying, protect the painting from dust and debris. Cover it with a clean, breathable cloth.

5: Tips and Warnings:
- Test in a small area before varnishing the entire painting to ensure compatibility and the desired effect.
- Avoid applying too much varnish at once, as it can lead to cracking. Thin, even coats are preferable.
- Once varnished, store the painting in a dry, cool place away from direct sunlight to prevent yellowing.
- If uncertain, consider seeking advice from a professional conservator or restorer, especially for valuable or irreplaceable artworks.
By following these steps and tips, you can varnish your oil painting effectively, ensuring its long-term protection and enhancing its visual appeal.
6: Varnish acrylic painting
Please note that this post pertains solely to oil painting. To varnish an acrylic painting, you must first apply an isolation coat and then proceed with varnishing.
An isolation coat for acrylic painting is a transparent protective layer positioned between your completed acrylic artwork and the varnish. This layer serves to physically separate them.
Primarily, it is utilized to shield the painting from any potential interaction with the varnish or protective finish. This precaution ensures that if you choose to remove the varnish at any point, your painting will remain intact.
Here is the isolation coat that I personally use for my acrylic paintings: https://amzn.to/3Gf7cD5
To read more about painting materials and mediums, check out this post:https://yingmclane.com/oil-painting-mediums-demystified/
I love it very much!
Thank you very much!